Homemade Crafts15:49 Aug 08 2010
Times Read: 1,044
I thought this was cute. Could be used as a gag gift, too.
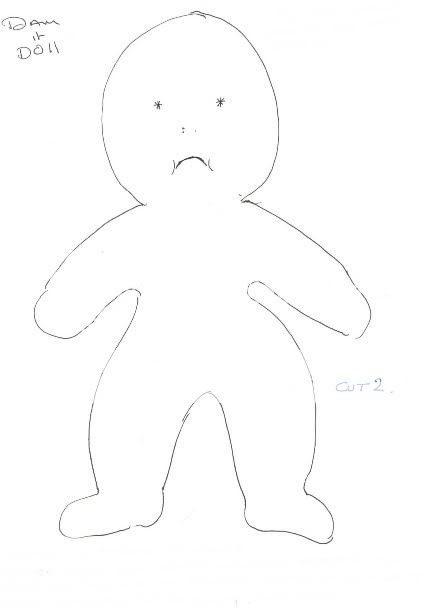
Damn It Doll
Materials:
Calico or felt
Wool or doll hair
Toy filling
Sewing machine
Felt pens
These make great little Dammit Dolls for stressful people
They can be thrown, jabbed, stomped and even strangled till all the frustration leaves you.
Attach the little poem to go with it:
When you want to kick the desk or
throw the phone and shout.
Here's a little dammit doll
you cannot do without.
Just grasp it firmly
by the legs,
and find a place to slam it.
And as you whack it's stuffing out,
yell, "dammit, dammit, dammit!"
You need to create a basic doll shape and cut it out of fabric, you can use any color fabric you want, but if you intend on adding facial features you will need to keep the fabric light.
Cut out 2 body shapes and sew around the edges.
Turn the doll the right side out and using a pen push out any edges in the hands and legs till it is all turned the right side out.
Then using your toy filling stuff the doll from the leg's up remembering to keep it firm enough so you can write against it.
Keep filling the doll till you reach the head, then using some glue or a few hand stitches close up the head.
Use your waterproof felt pens to draw on some facial features and glue on the hair along the head seam.
You can add as much or as little detail as you want to your doll.
--Other Poems--
Computer Dammit Doll
Weird things happen as you hit return
Or your keyboard just can't spell
Things don't seem to be going well
And the computer has a sudden "chill"
So instead of yanking the plug out
Just take this doll and whack it
Against the monitor as you shout
Dammit! Dammit! Dammit!
Road Rage Dammit Doll
In your car as you go to work
The guy in front is a jerk
Since he won't get out of the way
You yell, "I need to get there TODAY!"
Then to get more frustration out
Just grab the doll and whack it,
On the dashboard as you shout,
"Dammit, Dammit, Dammit!"
Sports Rage Dammit Doll
When the referee has made a bad call
And you want to yell and hit the wall
Or a player's missed an easy score
And you can't take it anymore,
Just grab this doll and whack it
At the TV as you shout
And knock the stuffing out,
Dammit! Dammit!, Dammit!!
Handmade Fleece Blankets
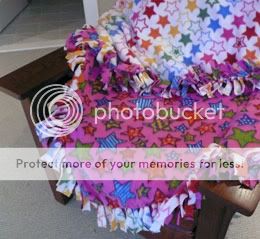
Things You Will Need
* Tape Measure
* 1 2/3 Yards of Print Outerwear Fleece
* 1 2/3 Yards of Solid Outerwear Fleece
Method
* Cut a 58-inch square from each fabric and remove the fabric fray.
* Put wrong sides of fabric together and see that edges are aligned correctly.
* Cut out the 5-inch squares from all the corners, so that you get the four sides of the blanket.
* Cut the fringe on all the four sides of the blanket that is 1-inch wide and 5-inch deep.
* Tie the front and back fringe together, using a overhand knot, all around the blanket.
* Your no-sew blanket is now ready. You may also make a matching pillow cover, using the same technique, for your child.
Stuffed Bunny Instructions
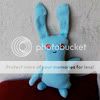
Step One: Trace
Trace your pattern pieces (you can fold them at the fold lines as long as you are tracing directly onto a fold as shown) and then cut out!
Step Two: Turn & Sew
Turn all your legs, arms, tail and ears inside out and sew the edges. Turn them right side out and stuff.
Step Three: Add Tail
If you are doing a tail, cut a small slit in one side of the body, insert tail and sew on securely from the other side.
Step Four: Bunny Sandwich
Now you'll be attaching the legs, arms and ears. Position them towards the inside of the right side of your fabric as shown above and pin and then sew.
Next, pin the other side of the body on top and sew all the way around the bunny sandwich, leaving a hole at the bottom between the legs to turn it right side out.
Step Five: Turn, Stuff, Close
Finally, turn your bunny right side out and stuff!
Handstitch the hole at the bottom and add eyes, mouth, etc. Choking Hazard Warning: Please do NOT use buttons for bunnies going to children under age 3, please use felt or hand embroider instead.
Stuffed Teddy Bear Instructions
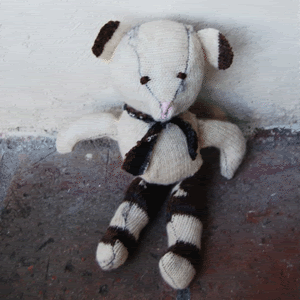
Step One
After felting your wool sweater, print out the free teddy bear pattern PDF for the head, arms and ears and the teddy bear pattern PDF for the legs and body. This is a template which means you'll need to add your own seam allowance. Sew up to the nose from the neck, leaving the rest unsewn to add in the top flap.
Step Two
After you've sewn the three head pieces together, turn right side out and sew on the ears. You can hand stitch these on top, or cut little slits in the fabric and pull through and sew. Don't worry about getting them exactly even, if they are a little crooked it will only add character and personality to your bear!
Step Three
After you've sewn all your individual parts, stuff and assemble. I personally hand-sew when I assemble because I tend to overstuff and find it easier than dealing with the sewing machine. Finally, embroider on eyes, a nose and a mouth and it comes to life!
I also added a scarf out of some sweater scraps.
Place Mat Purse
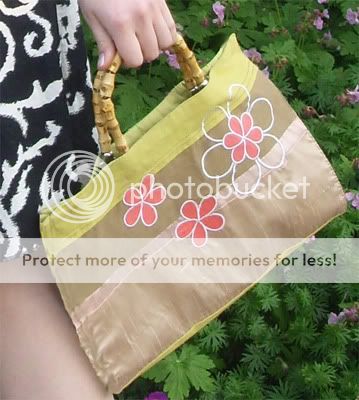
Lay the placemat face up on the floor. Fold up the bottom of the placemat.
Start sewing at the bottom edge of your fold. Sew all the way up to the top, stitching about a 1/8" from the edge. Repeat on the other side of the placemat. Be sure to tie off your thread on the inside of each side to prevent your new seams from unraveling.
Center a handle on one side, just below the top. To find the center, gently fold one side in half.
Be sure that your metal handle fasteners do not show. Sew around the metal hoops of the handle fastener. Use a buttonhole stitch for the best results.
When you sew the handles on, be sure you are using a thread that matches the outside of the placemat. If your placemat is lined, sew only through the inner layer so that no stitching shows on the outside of the bag.
After the handles are secure, your bag is finished. Try some of these tips to make your bag truly unique.
Here are some cute inexpensive gifts for kids for Christmas.
Cowboy Boot Stocking

CRAFT MATERIALS:
Scissors
2 pieces of animal print fabric, each 21 by 16 inches
3 pieces of black felt, each 21 by 16 inches
Long sewing pins
Large-eye sewing needle
Black embroidery floss
1 foot of 5/8 -inch black ribbon
Silver buckles (sold at fabric stores)
Time needed: About 2 to 3 Hours
1. The Basic Stocking: Click here to download the cowboy boot stocking pattern.
2. Cut 1 boot shape from each piece of the animal-print fabric. Be sure to cut the fabric boots so the toes point in opposite directions with the print sides up.
3. 1 Cut 1 boot shape from each piece of the animal-print fabric. Be sure to cut the fabric boots so the toes point in opposite directions with the print sides up.
4. Cut a decorative shape for the top and bottom of the boot front from 1 piece of the black felt and 1 boot shape from each of the remaining 2 pieces of felt.
5. Place 1 fabric boot on top of a felt boot, print side up, and pin the decorative shapes on top.
Stitch diagram 6. Using the floss, whipstitch (see page 131) around the inner edges of the decorative pieces through both boot shapes. Leave the outside edges open.
7. Pin together all 4 boots with the other fabric boot on the bottom, print side out, then whipstitch around the edges, leaving unsewn the top edges and about 3 inches from the top corners.
8. At the top, sew together the front 2 flaps, then the back 2.
9. The Trimmings: Cut two 2- by 7-inch strips of animal-print fabric.
10. Fold the strips in half lengthwise with the print sides out and sew along the edges.
11. Sew 1 strip to the top front of the boot and the other to the back for bootstraps. (You can use the straps to hang the stocking.)
12. Weave the ribbon through the silver buckles and sew it to the boot.
Tips:
A Stitch for All Stockings
Thread your needle with a length of floss and knot one end. Begin sewing by pushing the needle up through the underside of the fabric and then out the top. Loop the needle back under the fabric and repeat the stitch.
Here is another one. You could fill them up with goodies and then give them as gifts.
Elf Stocking
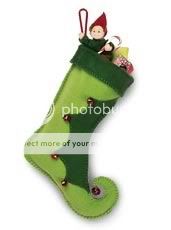
CRAFT MATERIALS:
Scissors
2 pieces of light green fleece, each 24 by 20 inches
3 pieces of dark green felt, each 24 by 20 inches
Long sewing pins
Large-eye sewing needle
Dark green embroidery floss
Red jingle bells, 4 medium and 1 large
Clear tape
9 inches of red twist cord
Fiberfill
Time needed: About 2 to 3 Hour
1. The Basic Stocking: Click here to download the elf boot stocking pattern.
2. Cut 1 boot shape from each piece of the light green fleece
3. Cut a decorative shape from 1 piece of the dark green felt for the front of the stocking and 1 stocking shape from each of the remaining 2 pieces of the felt.
4. Place a light green boot on top of a dark green boot, pin the decorative shape on top, and use the floss to whipstitch (see page 131) around the inner edge of decorative shape through both boots.
5. Pin together all 4 boots with the dark green boots on the inside.
Stitch diagram 6. Using the floss, whipstitch around the edges, sewing the boots together. Leave the top edges unsewn.
7. At the top, sew together the front 2 edges, then the back 2.
8. Fold down the top to make a cuff.
9. The trimmings: Use the floss to sew the medium red bells to the decorative shape and the large red bell to the toe tip.
10. Tape the ends of the cord to keep them from fraying, then sew the cord to the stocking for hanging.
11. Stuff the curly toe of the boot with fiberfill to keep it from flopping over when the stocking is empty.
Tips:
A Stitch for All Stockings
Thread your needle with a length of floss and knot one end. Begin sewing by pushing the needle up through the underside of the fabric and then out the top. Loop the needle back under the fabric and repeat the stitch.
Picture Ornaments
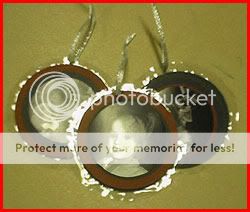
SUPPLIES:
-Photos
-Acid-free card stock
-Scissors
-Circle cutter or circle template
-Acid-free tape
-Lamination paper
-Hole punch
-Ribbon
1. Trace a circle onto the photo and cut out. If you have a circle cutter, you could use it too.
2. Mount photo on different color card stock and trim circles.
3. Laminate and punch a hole in the top.
4. Tie a ribbon for a hanger.
Tile Picture
step 1
Getting started
You will need:
1. Nice photo
2. Computer
3. Nine pieces of 10x10cm tiles
4. Five sheets of printer paper
5. Five strips of 10x20cm tissue paper
6. Double sided adhesive
7. Printer
8. Exacto knife
9. Decoupage glue
10. Paintbrush
step 2
Picking and editing you photo
First you have to pick a nice photo. Make sure you pick a photo in which you will not cut away vital parts (such as eyes) later on.
Chose which part of the photo you want to use and cut out a square. Put the square in a new document.
On this new document you can:
Change image size to 30cmx30cm.
Desaturate the image.
Change brightness and contrast until you get the desired result.
You might want use the paintbrush to get rid of unwanted details in the background.
You might want to reverse the picture, otherwise you will end up (like me) with a mirror image of your original photo.
step 3
Dividing your picture into smaller elements
In order to print your paper you will have to take a few extra steps.
Make a grid on your edited photo with lines at 10 and 20 cm.
Cut out the squares between the lines. Cut 0,5 cm away from the lines! Otherwise you will end up with a distorted face in the end.
Paste the squares into 5 new documents, 2 in each except for the last one which will have just one square.
If needed, rotate the new documents to make them printable.
step 4
Printing your photo on tissue paper
Obiously it is hard to put tissue paper into an ordinary laser printer. This is a nice trick to make it work.
Take your strips of 10 x 20cm tissue paper. Put double sided adhesive on upper and lower side.
Attach to middle of printer paper.
Do NOT use common tape as it will melt in your laser printer and make it useless (take my word for granted, I have tried)
Print the 5 documents on the 5 pieces of tissue paper
step 5
Cutting the parts
o need for longer explanation. Cut all nine squares. Try not to cut your fingers as well.
step 6
Time to use the glue!
Put decoupage glue on tiles. Adhere tissue paper.
If you want a softer look, adhere pieces with printed side facing tile. (That is the reason you might want to reverse it earlier). For a more detailed look, adhere printed side out.
When dry, add at least two more layers of decoupage glue on top of tissue paper.
step 7
Finished!
Now you might want to put tiles into a frame or just stick to a piece of board and put on your wall.
Good luck!
Recycled Bead Bracelet out of Magazines

For one recycled paper, glass and silver bead bracelet (similar to the two pictured below), you will need:
-1 page from an old magazine, junk mail, calendar, brochure or a piece of gift wrapping paper- suggest choosing a colors you enjoy and one with a glossy finish. Don't worry about words on the page!
-A paper cutter with marked measurements or an utility/ exacto knife and ruler
-A glue stick
-Wooden toothpicks
-Clear nail polish and a small piece of styrofoam (optional, see Step 4)
-Elastic beading cord (about 9-10")
-Leftover silver and glass beads
-Cuticle scissors
step 2
CUT THE MAGAZINE PAGE INTO STRIPS
-Tear or cut the page from the magazine (calendar, brochure, wrapping paper, etc.) that you have selected.
-Using a paper cutter (pictured) or an utility knife, begin cutting the page into strips. Starting at either the bottom or the top of the page, cut the page into 1/2" strips. (The strips I typically use are approx. 1/2" by ~7-8" long.) You may cut the entire page into strips or cut at least four for the bracelet.
-Next, cut each strip in half on the diagonal. To make one mixed bead bracelet, I typically use 8 diagnonally cut "triangle" shaped pieces of paper.
step 3
ROLL AND GLUE
-Organize a work space with the 8 diagonal paper strips, several toothpicks, a glue stick and some clear nail polish.
-Take a toothpick and one paper strip. Roll the WIDE end of the paper strip completely around the toothpick ONE rotation. Next, take the glue stick and quickly cover the remaining paper surface with glue. I usually quickly run the glue stick over the paper twice. You may need to wipe any excess glue from your hands if they get too sticky!
-Now it is time to completely and TIGHTLY roll the paper stip around the toothpick. Smooth the tip/end of the paper strip in place. Next, slip the paper "BEAD" off the toothpick. It should slide off easily since 'the glue was not applied to the section of the paper that directly touches the toothpick.
Note: This opening made by the toothpick will provide the space to string your beads onto the bracelet cord.
Just make a little stack of completed beads...the glue will set up while you coil the remaining paper beads.
step 4
SEAL THE PAPER BEADS
This step is optional...
I prefer to add a gloss coating to the beads. It seems to harden/ cure the paper and helps the bead to be more water-resistant (ex. if water splashes onto the bracelet when washing your hands---would not recommend wearing the bracelet while bathing---even if you do seal with the nail polish!) You decide if you want to include this step...
-Select a finished/glued bead. Place upon a toothpick and "polish" with the clear nail polish. The polish I use dries in less than 5 minutes. I stick a row of the toothpicks containing the polished beads in a piece of styrofoam so they may dry without touching the table top or each other.
-After the beads are dry, inspect each one and use the cuticle scissors to trim away any tiny paper tags that are not completely glued/ sealed in place.
step 5
STRING THE BEADS
-Organize your beads into a "stringing" order. I usally use 8 recycled paper beads mix in a few leftover silver and glass beads for color and variety.
-Cut the beading cord in a 9-10" piece. I like to triple knot the cord- so I add in a little extra cord to make sure there is enough to tie and then trim the excess. If you are making a bracelet for a child or smaller wrist, adjust the size accordingly.
-String the beads, knot and trim the excess cord.
step 6
ENJOY YOUR RECYCLED PAPER BEAD BRACELET!
You did it! Enjoy wearing your bracelet....
Here is a homemade candle recipe:
Candle Ideas
Making homemade candles can be a fun hobby, whether making them as gifts or for yourself to enjoy. Candle making usually requires some experimentation, but when you discover how to make those perfect candles, it's well worth the effort.
There are a few basic supplies needed for making most candles:
* wax
* wicks
* mold or containers
* wax melter
* candle making thermometer
* fragrances
* dyes
* putty for molds
First decide on a wax you would like to start with, there are three different kinds to choose from: paraffin wax, soy wax, and beeswax. Paraffin wax is most commonly used in candles, this wax is found at most candle making stores. Soy wax is all natural, made from soybeans, and cleans up easily with soap and water. Beeswax is all natural too, and making beeswax candles is often easiest because you simply wrap a sheet of beeswax tightly around a wick then seal it with your thumb, which means no melting is required.
To begin, spread newspapers around the candle making area. First you melt your paraffin or soy wax and it must be double-boiled. Usually you place a large pot that is about half-filled with water on a burner over low-medium heat, place a melter in the water, then gradually place wax pieces into the melter. When the wax has melted, you can add coloring or fragrance as desired.
To make molded candles, cut the wick two inches taller than you want the candle to be, then thread it through the hole at the bottom of the mold, then plug the outside of the hole with putty. Place a pencil or similar item over the top of the mold and tie the top of the wick to it, centering the wick. If the mold is cardboard, plastic, or glass, heat the wax to 130 degrees Fahrenheit. If the mold is metal, then heat the wax to 190 degrees. You can use a candle or candy thermometer to measure this. When the right temperature is reached, lift the melter by the handle and slowly pour the wax into the mold. Let cool for twelve hours then refrigerate for twelve more hours, then your candle is ready to be removed.
To make votives and other small container candles, you can use pre-tabbed wicks by simply placing them in the center of the votive candle molds or containers, then pour the wax mixture over and let stand for twelve hours, refrigerating the votives.
This should give you a good start in this enjoyable hobby.


COMMENTS
-